Der Fehler 0xc000000e beim Versuch, Windows zu starten, bedeutet, dass es sich um beschädigte Startkonfigurationsdaten handelt . Die Startkonfigurationsdaten sind ein globaler Speicher für alle Optionen und Einstellungen zum Booten auf neueren Windows-PCs.
Diese Fehlermeldung wird angezeigt, wenn Sie versuchen, Ihr Gerät zu starten, und es wird ein schwarzer Bildschirm angezeigt, auf dem Sie Anweisungen zur Reparatur Ihres Computers mithilfe einer Installationsdiskette oder eines Wiederherstellungslaufwerks erhalten. Leider ist dieses Wiederherstellungslaufwerk die einzige Möglichkeit, dieses Problem zu lösen. Daher sollten Sie sich vor dem Start eines zulegen. Wenn Sie es nicht haben, können Sie es ganz einfach mit dem Rufus- oder Windows Media Creation-Tool von jedem anderen PC oder Laptop aus erstellen .

Sie müssen auch Ihr BIOS starten, um die Startreihenfolge zu ändern und Ihren PC vom Wiederherstellungslaufwerk anstelle Ihrer Festplatte zu starten. Führen Sie dazu die folgenden Schritte aus:
- Geben Sie die BIOS- oder UEFI- Einstellungen ein, indem Sie vor dem Start von Windows die vom Hersteller Ihres Motherboards angegebene Taste drücken. Diese Taste ist normalerweise Esc, Delete, F2, F8, F10, F12 oder Backspace, je nach Hersteller. Sie können online nach dem Aufrufen des BIOS suchen , gefolgt von Ihrem Computermodell.
- Navigieren Sie im Boot zum Start. Verwenden Sie die Anweisungen im BIOS, um die Startreihenfolge zu ändern, und stellen Sie entweder die CD-ROM oder den USB-Anschluss als erstes Gerät ein, je nachdem, ob es sich bei Ihrem Wiederherstellungslaufwerk um eine CD oder ein Flash-Laufwerk handelt .
- Speichern Sie Ihre Einstellungen und beenden Sie.

Methode 1: Erstellen Sie die Startkonfigurationsdaten neu
Dazu müssen Sie Ihren Computer vom Wiederherstellungslaufwerk starten. Wenn Sie Ihr BIOS mit den obigen Schritten konfiguriert haben, können Sie dies tun, indem Sie eine beliebige Taste drücken, sobald die Eingabeaufforderung auf Ihrem Display angezeigt wird. Führen Sie die folgenden Schritte aus, um den BCD neu zu erstellen, nachdem der Computer vom Wiederherstellungslaufwerk gestartet wurde:
- Im Windows Setup - Dialogfeld Set alles auf die entsprechenden Werte, wählen Sie Ihre Sprache und klicken Sie auf
- In der unteren linken Ecke, klicken Sie auf Computer reparieren , und wählen Sie zu Problembehandlung aus der Option Bildschirm auswählen.
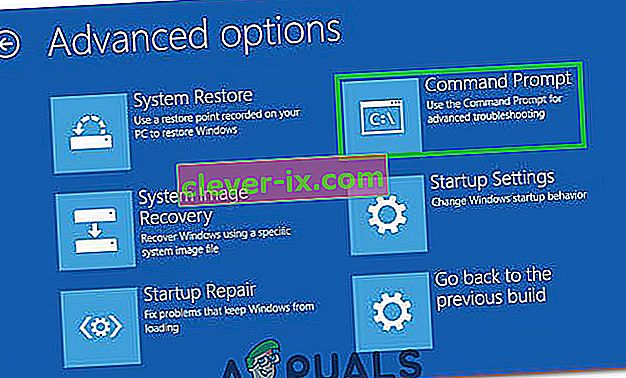
- Klicken Sie im Bildschirm Fehlerbehebung auf Erweiterte Optionen und dann auf Eingabeaufforderung.
- Geben Sie beim Öffnen der Eingabeaufforderung die folgenden Befehle ein und drücken Sie nach jedem Befehl die Eingabetaste auf Ihrer Tastatur:
bootrec / scanos bootrec / fixmbr bootrec / fixboot bootrec / rebuildbcd
- Starten Sie Ihren Computer, und es sollte gut booten, ohne wieder das Problem gegenüber .

Methode 2: Reparieren Sie Ihr Betriebssystem mit dem Wiederherstellungslaufwerk
Diese Methode repariert auch Ihr Betriebssystem mit der Eingabeaufforderung des Wiederherstellungslaufwerks, und Sie sollten in der Lage sein, Windows zu starten, ohne das Problem erneut zu sehen. Starten Sie vom Wiederherstellungslaufwerk und befolgen Sie die nachstehenden Anweisungen.
- Verwenden Sie die Schritte 1 bis 3 der vorherigen Methode, um zur Eingabeaufforderung des Wiederherstellungslaufwerks zu gelangen.
- Geben Sie in der Eingabeaufforderung die folgenden Befehle ein, gefolgt von einer Eingabetaste auf Ihrer Tastatur, um sie auszuführen. Das Dienstprogramm StartRep.exe korrigiert die Werte der Startumgebung und sollte den BCD-Fehler beheben. Beachten Sie, dass Sie diesen Schritt möglicherweise mehrmals wiederholen müssen, falls er fehlschlägt.
cd x: \ sources \ recovery StartRep.exe
- Wenn der vorherige Schritt zum Reparieren von Windows nicht geholfen hat, geben Sie bcdedit in die Eingabeaufforderung ein, um die Werte für den Windows-Boot-Manager anzuzeigen .
- Beachten Sie die Werte für Gerät . Wenn sie unbekannt sind , geben Sie die folgenden Befehle ein, gefolgt von einer Eingabetaste , um sie auszuführen. Beachten Sie, dass Sie C: bei Bedarf durch die Partition ersetzen sollten, auf der Ihr Betriebssystem installiert ist.
bcdedit / set {DEFAULT.EN_US} Gerätepartition = c: bcdedit / set {DEFAULT.EN_US} osdevice partition = c: bcdedit / set {BOOTMGR.EN_US} Gerätepartition = c:- Wenn die Eingabeaufforderung abgeschlossen ist, schließen Sie sie, entfernen Sie das Wiederherstellungslaufwerk und starten Sie Ihr System neu. Es sollte jetzt keine Probleme beim Booten geben.
Der einzige Nachteil dieser Lösungen ist, dass sie einen Wiederherstellungsdrang, Geduld und starke Nerven erfordern. Wenn Sie sie jedoch wie beschrieben befolgen, sollten Sie den aufgetretenen Fehler beheben und Ihr Gerät wie zuvor weiter verwenden.
Methode 3: Aktivieren Sie die Windows 10 WHQL-Unterstützung im BIOS
Die Einstellung für die Windows 10 WHQL-Unterstützung ist in einigen OEMs vorhanden. Es verfügt über zwei Grundfunktionen: Überprüft während des Startvorgangs nach signierten Treibern und ermöglicht die Aktivierung der UEFI-Unterstützung. Wenn Sie Windows 10 verwenden, müssen Sie es aktivieren, damit Ihr Computer normal starten kann. Wenn es jedoch nicht ausgewählt ist, startet Ihr Computer möglicherweise den Fehler 0xc000000e. Sie können also auf das BIOS zugreifen, um festzustellen, ob die Einstellung für die Windows 10 WHQL-Unterstützung aktiviert ist. Wenn nicht, aktivieren Sie es, um es zu versuchen.
Sie sollten beachten, dass die Windows 10 WHQL-Unterstützungseinstellung nicht auf allen Computern unterstützt wird. Wenn Ihr Computer nicht über diesen Computer verfügt, können Sie überprüfen, ob die UEFI-Unterstützung auf Ihrem Computer aktiviert ist. Wenn nicht, können Sie es aktivieren, um festzustellen, ob der Fehlercode 0xc000000e verschwindet. Um es zu aktivieren:
- Fahren Sie Ihren Computer vollständig herunter und lassen Sie ihn mindestens einige Minuten lang stehen.
- Nachdem Sie sichergestellt haben, dass ausreichend Zeit verstrichen ist, starten Sie den Computer wieder und Sie sollten die Option " Drücken Sie diese Taste, um in den BIOS-Modus zu starten " beachten .
- Drücken Sie die Taste, um den BIOS-Modus zu starten.
- Überprüfen Sie nach dem erfolgreichen Booten im BIOS-Modus, ob im BIOS eine Windows WHQL-Einstellung vorhanden ist.
- Wenn es vorhanden ist, drücken Sie die Eingabetaste , um es auszuwählen, nachdem Sie es mit den Pfeiltasten markiert haben, und wählen Sie die Option „Aktiviert“ , um es auf Ihrem Computer zu aktivieren.

- Überprüfen Sie , ob das Problem dadurch behoben wird.

Wenn der Windows 10-Startfehler 0xc000000e nach dem Aktivieren der Windows 10 WHQL-Unterstützungseinstellung oder der UEFI-Unterstützung weiterhin angezeigt wird, müssen Sie möglicherweise die BIOS / UEFI-Konfiguration auf Ihrem Computer zurücksetzen.
Methode 4: Erstellen Sie BCD über Easy Recovery Essentials neu
Easy Recovery Essentials ist eine automatisierte Systemreparaturfunktion mit einem Klick, die die vollständige Reparatur und Rekonstruktion des BCD umfasst, um den Fehler „0xc000000e“ zu beheben, selbst in Fällen, in denen Windows aufgrund des Fehlers nicht gestartet wird.
Die automatische Startreparaturkomponente von EasyRE behebt alle BCD-bezogenen Probleme, behebt das BCD oder erstellt es von Grund auf neu, wobei die richtige Codierung und der richtige Pfad für die Partition verwendet werden, die nicht ordnungsgemäß geladen werden kann. Außerdem wird die Festplatte als online markiert, um sicherzustellen, dass sie ordnungsgemäß funktioniert.
Easy Recovery Essentials behebt garantiert automatisch den Fehler "0xc000000e" mithilfe der integrierten Option "Automatische Reparatur". EasyRE ist derzeit für Windows XP, Vista, 7, 8, 10 verfügbar und kann auf jedem PC heruntergeladen und erstellt werden.
- Besorgen Sie sich einen anderen Computer, mit dem Sie einen USB-Stick erstellen können, von dem aus wir den Computer starten können.
- Laden Sie hier Easy Recovery Essentials herunter.

- Brennen Sie das Bild.
- Starten Sie Ihren PC von der von Ihnen erstellten Easy Recovery Essentials-CD oder USB.
- Sobald EasyRE ausgeführt wird, wählen Sie die Option "Automatische Reparatur" und klicken Sie auf " Weiter".
- Nachdem EasyRE die Laufwerke Ihres Computers gescannt hat, identifizieren Sie den Laufwerksbuchstaben für Ihre Windows-Installation und wählen Sie ihn aus der Liste aus. Klicken Sie anschließend auf die Option für die automatische Reparatur .
- Easy Recovery Essentials analysiert das ausgewählte Laufwerk auf Probleme. EasyRE prüft und versucht, Fehler mit Festplatte, Partition, Bootsektor, Dateisystem, Bootloader und Registrierung automatisch zu korrigieren. Es ist kein Eingriff erforderlich, da die Reparatur von EasyRE vollständig automatisiert ist.
- Sobald der Prozess abgeschlossen ist, wird EasyRE seine Ergebnisse melden. Klicken Sie auf der Neustart - Taste Ihren PC neu zu starten und die Änderungen zu testen.

Methode 5: BIOS / UEFI-Konfiguration zurücksetzen
Einige Benutzer gaben an, dass ihr Problem mit dem Fehler 0xc000000e durch Zurücksetzen der BIOS / UEFI-Konfiguration behoben wurde. Sie können diese Methode also ausprobieren, um festzustellen, ob dieses Problem behoben werden kann.
Schritt 1. Öffnen Sie das BIOS-Menü
Um das BIOS auf die Standardeinstellungen zurückzusetzen, müssen Sie zuerst auf das BIOS-Menü zugreifen und die Option Standardeinstellungen suchen.
Windows 10-Benutzer können auf erweiterte Startoptionen von Windows 10 zugreifen und das BIOS-Menü aufrufen. Sie können auf Start -> Power klicken, die Umschalttaste gedrückt halten und auf die Schaltfläche Neustart klicken, um Windows in der Windows-Wiederherstellungsumgebung neu zu starten. Klicken Sie dann auf Fehlerbehebung -> Erweiterte Optionen -> UEFI-Firmware-Einstellungen und klicken Sie auf Neu starten, um den Bildschirm mit den BIOS-Einstellungen aufzurufen.
Alternatively, you can also restart your computer normally and press the required key in the startup screen to boot into the BIOS settings window. The hotkey is varied from different computer manufacturers, and it could be F12, Del, Esc, F8, F2, etc.
Step 2. Find the Setup Defaults Option
The name and location of the “Setup Defaults” option may be different from various computers. It generally calls like: Load Default, Load Setup Defaults, Load Default Settings, Load BIOS Defaults, Load Optimal Defaults, etc.
Use the arrow keys on the computer keyboard to find the BIOS setup default option in the BIOS settings screen. You may find it in one of the BIOS tabs.
Step 3. Reset BIOS
After you find the Load Setup Defaults option, you can select it and press the Enter button to start resetting the BIOS to factory default settings in Windows 10.
At last, you can press F10 to save and exit BIOS. Your computer will automatically reboot. If you need to change BIOS settings again in the future, you can follow the same instructions to access BIOS again to change it.
Method 6: Mark Boot Disk As Online
It is possible in some cases, that the disk that you have connected to the computer or the USB that you are trying to boot from has been marked as offline by the computer. Some computers tend to prevent extra applications, hardware, and other things from being able to run as soon as the computer starts because it allows for more convenient and fast startup experience. Therefore, in this step, we will be marking the Disk as online.
You still need to use a bootable USB medium to do this job. We will show you a step-by-step guide here:
- After booting your computer from the bootable USB drive, you need to go to Next > Repair your computer. Then, you will enter WinRE.
- Go to Troubleshoot > Advanced options > Command Prompt.
- Make sure to properly enter your login credentials if you are asked by the computer.
- Type in the following command inside the command prompt to successfully launch the disk part utility on your computer.
diskpart
- Type in either one of the following commands in the next window to list the currently connected disk drives to your computer.
List Disk List Volume
- Once the disks have been listed, you need to identify the disk that contains the Windows operating system and the one that you want to mark as active.
- After identifying it, select the disk using the following command and replacing the alphabet with the driver letter of that disk.
select disk A Select Volume A (Replace A with the Drive Letter)
- After you have successfully selected the disk, you must mark the disk as online in order to initiate the recognization process of the disk at startup. Use the following commands to do that.
Online Disk Online Volume
- Type in the following command to successfully get out of the command prompt and restart your computer after that.
Exit
- Check to see if marking the Disk as online has fixed your issue.

Method 7: Check your data cables, BIOS and drivers
Unplug all HDD data cables, and then plug them again. Revert to the previous drivers and BIOS settings if they were changed, or use “Restore factory settings” option in the BIOS. Make sure to write down all current BIOS settings that were previously selected, just in case it is required to switch back. If the error is caused by a change of the SATA disk controller’s mode in the BIOS or firmware, the fix can be as simple as entering the BIOS and toggling the SATA controller’s “mode” setting. The exact instructions differ from one manufacturer to the other, but the options will resemble what is shown in the screenshots below.
To check the boot order, follow these steps:
- Restart the computer
- Press the necessary key to open the BIOS menu. This key depends on the computer manufacturer and computer model. This is usually listed on the first screen that appears on the monitor. It can be any of the following: Esc, Del, F2, F8, F10 or F12.
- If the screen shows multiple keys, find the key to open “BIOS”, “setup” or “BIOS menu”
- Attempt to toggle between all three (or more) modes until a combination that results in Windows booting successfully once more is found.
Method 8: Boot Windows In Safe Mode
If above solutions didn’t fix the problem, then Start Windows into safe mode. This will start your PC with minimum system requirements, will not load startup programs, add-ons etc. And allow performing troubleshooting steps to fix Boot Error 0xc000000e:
Before you enter the safe mode, you need to enter the Windows Recovery Environment (winRE). To do this, you will repeatedly turn your device OFF, then ON:
- Hold down the power button for 10 seconds to turn off your device.
- Press the power button again to turn on your device.
- On the first sign that Windows has started (for example, some devices show the manufacturer’s logo when restarting) hold down the power button for 10 seconds to turn off your device.
- Press the power button again to turn on your device.
- When Windows restarts, hold down the power button for 10 seconds to turn off your device.
- Press the power button again to turn on your device.
- Allow your device to fully restart and you should boot into the Windows Recovery Environment.
Now that you are in the Windows Recovery Environment, you will follow these steps to take you to safe mode:
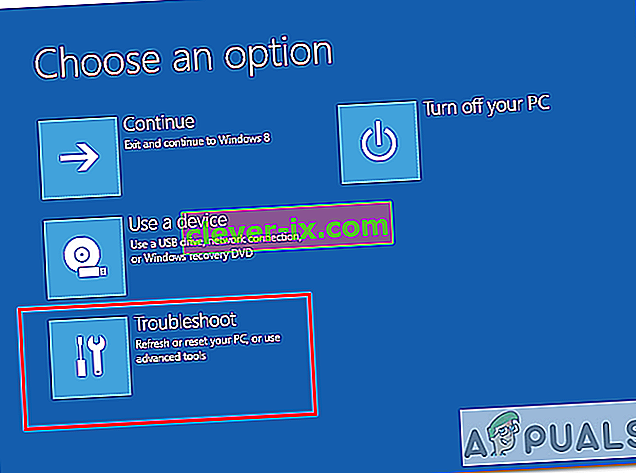
- On the Choose an option, screen, select “Troubleshoot” and then “Advanced options.”
- Now click on “Startup Settings” and click on “Restart.”
- After your device restarts, you’ll see a list of options. Select option “4” from the list or press “F4” to enter Safe Mode.

Note: If you need to exit safe mode, simply restart your device, or:
- Press the “Windows logo key + R.”
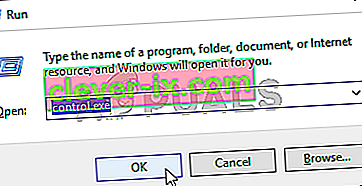
- Type “msconfig” in the Run box and then select “OK”.

- Select the Boot tab and under Boot options, clear the Safe boot checkbox.

Method 9: Check your disk with CHKDSK utility
If the hard drive has its file integrity compromised, it is possible to use built-in Windows CHKDSK utility to scan the disk and fix the file system errors.
- Connect a USB drive that has been made bootable or insert the Windows Installation Disk on your computer.
- After connecting one of these, boot from that connected device.
- After booting your computer from the device, click on “Next” and then on the “Repair your Computer” option.
- On the next window, click on “Troubleshoot” and then on the “Advanced” Option.

- On the next screen, make sure to select the “CommandPrompt” option to successfully launch into the command prompt.
- Provide the login credentials of your account in order to boot inside the cmd.
- Inside the command prompt, type in the following command to successfully run the check disk utility on your computer.
chkdsk C: /f (Make sure to replace the "C" with the Drive letter of your partition).
- Confirm any on-screen prompts and wait for the scan to be fully completed.
- Check to see if the issue is fixed by performing this step.
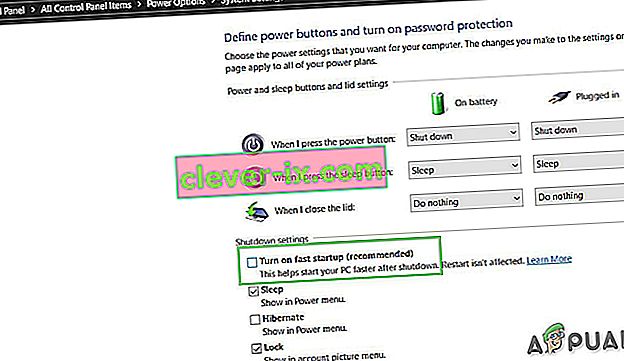
Method 10: Disable fast startup Feature
If your computer has been set up to use the Fast Startup feature, you might be getting this error message on your screen because of doing so. The Fast Startup feature is known to malfunction with some operating systems and hardware combinations.
Basically, when enabled, the feature automatically sends some launch configurations to be stored in your RAM to allow for a faster startup as indicated by its name but this configuration data can sometimes be corrupted which can lead to this error on your computer. Therefore, in this step, we will be disabling it completely. For that:
- Press “Windows” + “R” to open the Run prompt.
- Type in “Control Panel” and press “enter” to launch the classical Control Panel interface.
- Inside the control panel, click on the “Hardware and Sound” option and then select the “Power Options” button.

- Inside the power options, click on the “Choose what the power button does” from the left side.
- Click on the “Change Settings” option if the fast startup option is greyed out.
- Make sure to uncheck the “Turn on Fast Startup” option and save your changes.
- Closeout of the window and terminate any unnecessary applications.
- Click on the “Start Menu”, click on the “Power Options” and select “Shutdown” from the list.
- This option should completely power down your computer and after performing a complete shutdown, wait for some minutes before turning your computer back on.
- After the computer turns back on, check to see if the error message is fixed.
Note: This solution can only be applied if you are able to sometimes boot up your computer normally and are only encountering this error momentarily.


Method 11: Repair Corrupted System Files
It also possible in some situations that certain system files might have been corrupted due to a storage failure or due to some other reason. Therefore, in this step, we will be performing a complete repair of the corrupted system files and then we will check to see if doing so fixes this issue. For that:
- Press “Windows” + “R” to open the Run prompt.
- Type in “cmd” and then press “Shift” + “Ctrl” + “Enter” to launch the command prompt with admin privileges.
- Type in the following commands one by one and press “Enter” after each to successfully run an SFC scan and a DISM Scan on your computer.
DISM /Online /Cleanup-Image /RestoreHealth sfc /scannow
- Restart your computer completely once these scans are completed.
- Check to see if by performing these scans, you were able to fix this issue on your computer.

Method 12: Run Windows Startup Repair
Startup Repair is capable of diagnosing and fixing the found issues. For example, it can automatically scan system files, registry settings, configuration settings, etc. and try to fix the problem on its own. Startup Repair is especially useful when your computer is unbootable. Since your computer fails to boot, Windows can boot into WinRE automatically. While, if it doesn’t appear, you can interrupt the boot process three times in a row, and then the WinRE screen appears. Alternatively, if you have a bootable USB medium, you can also set your computer to boot from it and go to Repair your computer to enter WinRE.
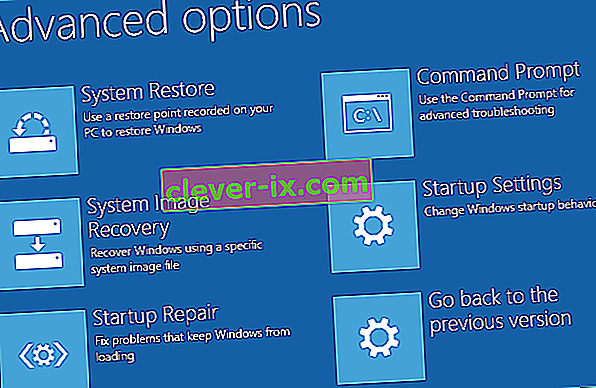
After you have successfully booted into the Windows Recovery Environment, click on the “Troubleshoot” option, and from there, select the “Advanced Options” screen. Inside the advanced options, select the “StartupRepair” button to successfully initiate the Startup Repairing process. Windows will begin to diagnose your computer automatically. When the process ends, your computer will restart automatically. You can wait to see whether it can boot successfully.

Problemumgehung: Stellen Sie sicher, dass keine zusätzlichen Geräte angeschlossen sind, bevor Sie in die Befehlszeile oder Startreparatur springen. Versuchen Sie am besten einen weiteren Neustart mit der geringsten Anzahl von Geräten und externen Laufwerken, die an den Computer angeschlossen sind. Dadurch wird sichergestellt, dass nichts, was kürzlich zum Computer hinzugefügt wurde, dieses Problem nicht verursacht. Ziehen Sie am besten alle aktuellen USB-Laufwerke, CDs, DVDs usw. heraus. Dazu gehört auch ein Speicherkartenleser. Stellen Sie sicher, dass alle externen Laufwerke und USB-Sticks oder USB-Sprunglaufwerke getrennt wurden, und versuchen Sie es erneut.


