Die Steam Cloud bietet eine einfache und transparente Möglichkeit, Ihre Spieldaten auf einem Remote-Speichersystem zu speichern. Die in der Auto-Cloud-Konfiguration angegebenen Dateien oder wenn sie auf die Festplatte geschrieben werden, werden nach dem Spiel automatisch auf die Steam-Cloud-Server (mithilfe der Cloud-API) repliziert.

Dies ist besonders nützlich, wenn der Benutzer seinen Computer wechselt. Der Spielfortschritt wird entweder von der Cloud-API fortgesetzt oder direkt von der Festplatte gelesen. Die Dateien werden vor dem Start des Spiels automatisch heruntergeladen, da Sie bereits Ihre Steam-Anmeldeinformationen eingegeben haben. Die Hauptaufgabe der Steam Cloud besteht darin, sicherzustellen, dass alle Dateien auf allen Computern synchronisiert sind, die ein Benutzer verwendet.
Benutzer haben die Möglichkeit, die gesamte Cloud-Synchronisierung zu deaktivieren, die in den Steam-Einstellungen des Clients vorhanden ist. Benutzer haben auch die Flexibilität, die Cloud-Synchronisierung pro Spiel zu deaktivieren. Bevor Sie mit den Lösungen fortfahren, aktualisieren Sie den Steam-Client auf den neuesten Build.
Was sind die verschiedenen Methoden zur Nutzung der Dampfwolke?
Steam bietet zwei verschiedene Methoden zur Nutzung der Steam Cloud.
An erster Stelle steht die Steam Cloud API. Die Cloud-API bietet eine Reihe von Funktionen, mit denen Sie die Steam Cloud direkt in Ihr Spiel integrieren können. Die Cloud-API übernimmt auch die Aufgabe, einzelne Steam-Benutzerdateien voneinander zu isolieren, und bietet außerdem eine bessere Kontrolle über die gesamte Steam Cloud.
Die zweite ist die Steam Auto-Cloud. Diese Funktion wurde hauptsächlich für ältere Spiele entwickelt, bei denen die Cloud-API nur schwer zu verwenden war. Es ist ein schneller Einstieg in die Steam Cloud, aber es fehlt die Flexibilität und Leistung, die die Steam Cloud-API bietet.
Die Entwickler empfehlen, die Cloud-API anstelle von Steam Auto-Cloud zu verwenden, da sie eine tiefere und effektivere Integration und Anpassung ermöglicht. Damit können Sie die Steam-Cloud optimal nutzen.
Wie löse ich einen Steam Cloud-Konflikt?
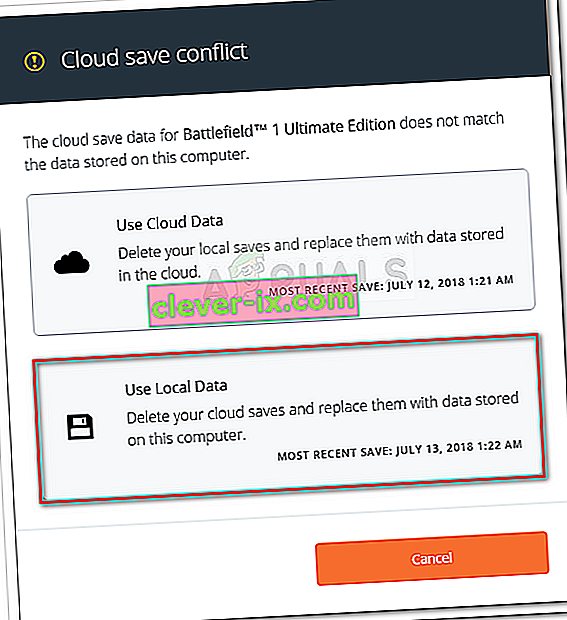
Ein Steam Cloud-Konflikt tritt auf, wenn der Steam Cloud-Inhalt nicht mit Ihren lokalen Spieledateien übereinstimmt, die auf Ihrer Festplatte gespeichert sind. Dies kann auf dem Computer auftreten, den Sie zu diesem Zeitpunkt verwendet haben, oder auf einem anderen Computer. Da die Datei ohne Synchronisierung an zwei verschiedenen Speicherorten geändert wurde, kann Steam nicht bestimmen, welche Datei aufbewahrt werden soll.

Sie werden höchstwahrscheinlich die Datei auswählen, die zuletzt geändert wurde. Das heißt, die neuesten Entwicklungen in Ihrem Spiel werden gespeichert. Sie sollten die im Fenster angezeigten Daten sorgfältig überprüfen. Überprüfen Sie sorgfältig das Datum und die Uhrzeit des Kontexts und entsprechen Sie dem Datum, an dem Sie das letzte Mal ein Spiel auf Steam gespielt haben. Dieser Kontext kann Ihnen bei der Bestimmung der zu behaltenden Version helfen.
Beachten Sie, dass das Spielen von Spielen im Offline-Modus die Synchronisierung Ihrer Spiele verhindert. Dies ist die wahrscheinlichste Ursache für den Steam Cloud-Konflikt.
Was ist, wenn Steam keine Dateien mit der Cloud synchronisieren kann?
Dieser Fehler weist darauf hin, dass Steam Ihre lokalen Dateien nicht mit der Steam Cloud synchronisieren konnte. Dies kann ein vorübergehendes Problem sein, mit dem die Steam Cloud-Server möglicherweise konfrontiert sind. Sie können den Steam Cloud-Status auf der Steam-Website überprüfen, um sicherzustellen, dass das Problem auf ihrer Seite liegt.

Wenn der Steam Cloud-Dienst einwandfrei funktioniert, liegt das Problem bei Ihnen. Sie können Ihre Steam-Verbindung überprüfen und Probleme beheben. Sie können auch überprüfen, ob nur Probleme bei der Synchronisierung mit der Steam Cloud auftreten.
Wenn Sie die Nachricht ignorieren und auf "Spiel spielen" klicken, kann dies zu einem möglichen Konflikt zwischen Ihren lokalen Dateien und der Steam Cloud führen. Es kann auch zu Fortschrittsverlusten und Spieldaten führen.
Was passiert, wenn ich nach dem Wechsel auf einen anderen Computer eine Datei oder einen Fortschritt verliere?
Wenn Sie Ihren letzten Fortschritt verpassen und anhand der Einstellungen überprüft haben, ob das Spiel die Steam Cloud verwendet, bedeutet dies, dass Steam Ihre Daten nicht erfolgreich synchronisieren konnte oder dass die Synchronisierung dazu führte, dass Ihre vorherigen Daten in das Spiel hochgeladen wurden Wolke.
Möglicherweise befindet sich Ihre Originaldatei oder der Fortschritt noch auf dem älteren Computer und konnte nicht synchronisiert werden. Wenn Sie Steam auf diesem Computer starten, wird Ihr Fortschritt angezeigt. In diesem Fall wird es automatisch auf allen anderen Computern aktualisiert, die mit Ihrem Steam-Konto verbunden sind.
Außerdem nutzen viele Spiele die Steam Cloud nicht. Sie können auf der offiziellen Seite des Spiels nachsehen, ob Steam Cloud-Unterstützung verfügbar ist. Wenn dies nicht der Fall ist und Sie keinen Zugriff auf den älteren Computer haben, bedeutet dies, dass Ihr Fortschritt verloren geht und es keine Möglichkeit gibt, ihn wiederherzustellen.
Wie lösche ich Dateien, die auf Steam Cloud-Servern gespeichert sind?
Steam Cloud wird verwendet, um den Fortschritt jedes Spiels zu sichern, damit Sie Ihren Fortschritt nicht verlieren, wenn Sie von einem anderen Computer aus auf das Spiel zugreifen. Mit der folgenden Methode können Sie bestätigen, dass Ihr Fortschritt von der Cloud gespeichert wird.
Überprüfen Sie, ob Ihr Spiel gesichert wird.
- Öffnen Sie Ihren Steam-Client . Öffnen Sie die Einstellungen, indem Sie auf die Steam-Schaltfläche in der oberen linken Ecke des Fensters klicken und die Option auswählen.
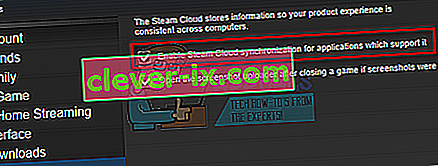
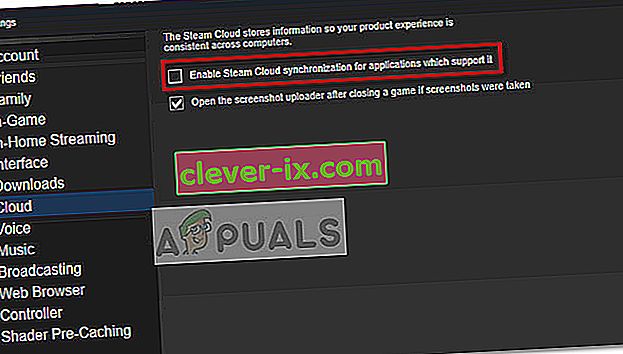
- Öffnen Sie die Registerkarte Cloud auf der linken Seite des Bildschirms. Überprüfen Sie, ob die Option " Steam Cloud-Synchronisierung für die Anwendungen aktivieren, die dies unterstützen " aktiviert ist.
- Klicken Sie anschließend auf die Registerkarte Bibliothek oben auf dem Steam-Client. Hier werden alle Ihre Spiele aufgelistet.
- Klicken Sie mit der rechten Maustaste auf das Spiel und wählen Sie Eigenschaften . Navigieren Sie dann zur Registerkarte Updates oben im Fenster.
- Hier unten im Fenster sehen Sie die Option " Steam Cloud-Synchronisation für [Spielname ] aktivieren ". Stellen Sie sicher , dass die Option geprüft .


Wenn Sie beide Optionen aktiviert haben, bedeutet dies, dass Ihr Spiel von der Steam Cloud gesichert wird und wir die Daten auch löschen können.
Was ist der Sicherungsmechanismus?
Das erste, was Sie wissen sollten, ist, dass es drei Versionen der gespeicherten Spieldaten gibt
- Die Originalversion wird im Ordner von AppData ( D1 ) gespeichert .
- Die Cloud-Version wird unter dem Speicherort Steam / userdata / SteamID / AppID ( D2 ) gespeichert .
- Die Cloud-Version, die auf den Cloud-Servern von Steam ( D3 ) gespeichert ist .
Beachten Sie die Anmerkungen (D1, D2, D3), die wir verwendet haben, da wir in Zukunft häufig darauf verweisen werden.
Wenn Sie das Spiel zum ersten Mal starten, wird D1 automatisch erstellt. Nachdem Sie das Spiel beendet haben, werden die Spieldaten in D1 aktualisiert und automatisch nach D2 kopiert. Danach wird D2 mit D3 synchronisiert und lädt so Ihren gesamten Spielinhalt hoch.
Wenn Sie Ihr Spiel zum ersten Mal von einem anderen Computer aus starten und Steam D3 auf seinen Servern hat, D2 jedoch nicht auf dem Computer erkennt, werden die Daten automatisch heruntergeladen und D3 nach D2 kopiert. Steam Cloud lädt die fehlenden Daten auch automatisch herunter, wenn Sie Steam starten.
Kurz gesagt, die wichtigsten Daten für uns sind D2. Wenn wir es manipulieren können, können wir die Daten, die Sie löschen möchten, erfolgreich löschen.
Hinweis: Einige Spiele haben kein D1 und speichern ihre Daten direkt in D2. Während einige Spiele D2 nicht als Medium verwenden und die Daten direkt von D1 in die Cloud hochladen.
Was sind die Benutzerdateninhalte?
Im Verzeichnis Steam / userdata sollten Sie einen Ordner haben, der Ihrer SteamID entspricht (Sie überprüfen Ihre Steam-ID, indem Sie unseren Artikel darüber lesen). Nachdem Sie es geöffnet haben, werden Ordner für jedes Spiel erstellt, das Sie spielen. Sie werden anhand ihrer AppID identifiziert (AppID kann einfach überprüft werden, indem Sie das Spiel im Steam Store besuchen und es aus der URL extrahieren). In diesem Spielordner finden Sie zwei Entitäten.
- remotecache.vdf: Diese Datei beschreibt alle Eigenschaften von Dateien, die im Remote-Ordner enthalten sind.
- Remote- Ordner . Dies enthält alle Dateien, die mit Ihrem Steam Cloud-Server synchronisiert sind.
Daten aus der Cloud löschen
In this method, we will be following two important steps. We will first bring up the Steam Cloud conflict notification and then delete the Cloud files.
Do note that you would have to follow these steps game by game to delete all of the Steam cloud content.
First, we need to delete the AppID folder from your Steam directory. After you restart your computer and Steam, Steam will automatically re-create the folder. We need to perform this step to ensure that the Steam Cloud is working perfectly and we can go ahead with the part of deletion.
- Open your Steam directory. The default location for your Steam installation is
C:\Program Files (x86)\Steam
- Search for a folder of AppID and Delete it. Then restart your computer and Steam. Start a game for a few minutes. Make sure that you have a working internet connection.
- Navigate back to the Steam directory and check if the AppID folder is back. If it is, it is confirmed that your Steam Cloud is working perfectly and we can proceed with the method.
Bringing Up Steam Cloud Conflict Dialogue
The first part of the solution is probably the most difficult. To delete all your Steam Cloud data, it is necessary to bring the conflict dialogue. Without it is not possible to delete the data present in your Cloud. Steam Cloud conflict occurs when the Cloud files differ from the data present on your hard drive.
There are two methods to bring about this conflict:
Method 1:
- Make sure that your Steam Cloud is enabled by following the steps mentioned above. Exit Steam completely by ending all the processes starting with Steamclientbootstrapper using the task manager.
- Now will alter all the files in the location
Steam\userdata\SteamID\AppID\remote
The objective is to make sure that all the files are different from those uploaded to the Steam cloud. We can’t simply delete the files from this location as Steam will automatically notice that the files are missing and download the same ones from the Cloud servers. We can achieve our task by corrupting them and making them 0-byte files.
- Navigate to
Steam\userdata\SteamID\AppID\remote
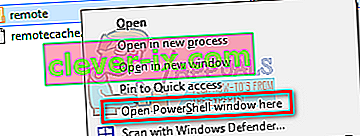
- Now hold shift and right-click on your remote folder. Select the option “Open PowerShell window here”.
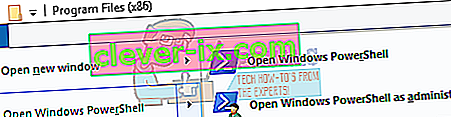
- You can also open PowerShell when in the folder by clicking the File option present at the top left side of the screen and selecting “Open Windows PowerShell as administrator”.
- Once PowerShell is opened, type the exact text written below


clc –path “C:\Program Files (x86)\Steam\userdata\SteamID\AppID\remote\*"
If you fail to write the correct code, you will get an error like this

If you correctly type in the line there will be no confirmatory message and you will get a window like this.

Start your Steam and there will be the conflict windows present on your Steam client.
Method 2:
This is an easier method as compared to the earlier one but it isn’t that efficient.
- Open your Steam client. Open its Settings by pressing the Steam button present at the top left corner of the window and selecting the option.
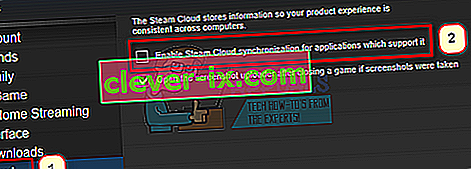
- Open the Cloud tab present on the left side of the screen. Uncheck the option “Enable Steam Cloud synchronization for the applications which support it”.

- Now navigate to your Stream directory as you did earlier and delete all files present in the folder of AppID. The file path for deletion is
Steam\userdata\SteamID\AppID.
- Now start the game to make new and different files in the file location.
- Exit the game and Steam completely by ending all Steam processes in the task manager (end steamclientbootstrapper first).
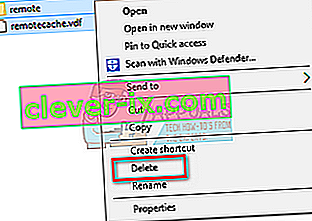
- Now delete the remotecache.vdf file present in the location
Steam\userdata\SteamID\AppID
- Start your Steam.
- Head over to the client’s Settings and enable the cloud.

Now a Steam conflict dialogue will come forth and we can proceed with the remaining method.
Deleting Cloud files
Once the Cloud conflict error is forth, don’t click any option and follow the instructions below.
- Navigate to the following file path
Steam\userdata\SteamID\AppID
and delete all the files in it. There will be two files (remote folder and remotecache.vdf). Delete both of them.
- Now go back to the conflict window and select the option of “Upload to the Steam Cloud”. Now Steam will sync your AppID folder while there will be nothing in it and the previous data on your Steam Cloud will be deleted.

- Now the game will start automatically but it will create new files that will be synced to your Steam cloud when you close it. We can prevent it from happening by pressing alt + tab. This will open the open windows on your screen. Select the Steam client from the list of windows.

- Once you are in the Steam client, open the client’s Settings. Navigate to the Cloud tab and uncheck the line which enables cloud.
- Now return to the game and exit. No files will be synced to your Steam cloud.
- Exit Steam and delete the AppID folder as we did before.


How to Make Sure If it Worked?
Remember how we checked at the beginning of this method if the Steam Cloud was running as expected by deleting the AppID folder and checking if it was made again. If there is no file present in the Steam cloud, there will be no file downloaded to your computer.
- Enable the Steam cloud as we did in the guide.
- Exit Steam completely by using the task manager.
- Delete the AppID folder (if you didn’t in step 2).
- Now check D3 (these are the cloud files) and compare them with D2 (local files on your computer). If there is nothing in D3, there will be nothing in D2 too!
- Check the following directory Steam\userdata\SteamID
No new AppID folder would have been created.
You can also check by logging Steam in on another computer and checking if the files exist.
If you make it till here without any problems, you have successfully deleted all the files on your Steam Cloud.
How to Delete Steam Cloud Saves from OS X
The procedures above can also be replicated on OS X and older Macs to a slight extent. By following the steps below, you will be able to delete your local saves. You can then disable the Steam Cloud synchronization from the Steam application, start a new game and create a few new saves. Then, when you return to re-enable the Steam Cloud synchronization features, the client will ask you which saves do you want to use. You can then choose the new ones which will delete and replace your old saves from the cloud.
To make things even clearer, here’s a step-by-step guide through the whole thing:
- Open your Steam application and go to Steam > Settings via the ribbon at the top of the window.
- In the settings menu, click on the Cloud tab and uncheck the box associated with Enable Steam Cloud synchronization for applications that support it.
- Close Steam completely and open your Finder app.
- Go to Library > Application Support > Steam > SteamApps > Common and open the folder of whichever game you want to delete the save files.
- Next, open the SAVE folder to reveal the saves of the game.
Note: If the location specified above doesn’t land you to the save files, try the following locations but mind the placeholders:
Users / *Your username* /Library / Application Support / *Game Folder* / Game Documents / *Game* / GameSaves Users/ *Your username* / Library / Application Support / Steam / userdata / *GameNumber* / remote Users/ *Your username* / Library / Containers / *Game Folder* / Data /Library / Application Support / *Game* / GameDocuments / *Game* / gamesaves
- Once you manage to identify and delete the local saves from the game you’re targeting, open the Game and create a few new saves.
- Exit the game, open steam and return to Steam > Settings > Cloud. From the cloud tab, re-enable the checkbox next to Enable Steam Cloud synchronization for applications which support it and click the OK button below.
- Steam will ask you whether you want to use the newly created local saves or the ones that you already have on the cloud. Choosing to use the new ones will delete the old saves that you currently have on Steam Cloud.