Viele Benutzer haben ein Problem, bei dem Steam Ihre Zeit nicht herunterladen kann. Es wird angezeigt, dass die Inhaltsserver zum Herunterladen nicht erreichbar sind. Man kann mit Sicherheit sagen, dass dieses Problem aufgrund vieler Konfigurationen der Benutzer nicht durch ein bestimmtes Problem verursacht wird. Wir haben einige der Lösungen aufgelistet, die alle Methoden des Steam-Supports sowie der Benutzer enthalten.

Lösung 1: Entfernen der Proxy-Einstellungen
Ein Proxyserver wird in Organisationen verwendet, in denen der offene Internetzugang eingeschränkt ist. Ein Proxy wird verwendet, um das Netzwerk zu verfolgen und den Benutzern ein alternatives Gateway bereitzustellen. Proxy-Einstellungen werden häufig zu einer Hürde, wenn Steam versucht, eine Verbindung zu seinen Servern zum Herunterladen herzustellen.
Es gibt zwei Möglichkeiten, den Proxy auf Ihrem Computer zu deaktivieren.
Methode 1: Chrome
- Öffnen Sie den Chrome-Browser und klicken Sie beim Öffnen auf das Chrome-Menü (oben rechts).

- Klicken Sie nach dem Dropdown-Menü auf Einstellungen .

- Sobald die Seite Einstellungen geöffnet ist, geben Sie " Proxy " in die Dialogleiste oben ein.

- Wählen Sie aus den Suchergebnissen das Ergebnis " Proxy-Einstellungen öffnen " aus.

- Wenn die Einstellungen geöffnet sind, klicken Sie auf der Registerkarte "Verbindungen" unten auf " LAN-Einstellungen ".

- Deaktivieren Sie die Zeile " Einstellungen automatisch erkennen ". Änderungen speichern und verlassen. Starten Sie Steam neu.

Methode 2: Über Netzwerkeinstellungen
- Drücken Sie die Windows + R-Taste, um die Anwendung Ausführen aufzurufen.
- Geben Sie im Dialogfeld "inetcpl" ein. cpl ”.

- Die Internet-Eigenschaften werden geöffnet. Navigieren Sie zur Registerkarte Verbindungen und klicken Sie auf LAN-Einstellungen.
- Deaktivieren Sie in den LAN-Einstellungen die Zeile " Einstellungen automatisch erkennen" . Speichern Sie die Änderungen und beenden Sie das Programm, um Steam neu zu starten.
Lösung 2: Deaktivieren von Chrome-Erweiterungen
Manchmal können die in Chrome vorhandenen Erweiterungen eine echte Hürde darstellen. Sie beeinträchtigen Ihre Netzwerkeinstellungen, insbesondere das Add-On " Ghostery ". Es überwacht Ihr Netzwerk und liefert Statistiken darüber, wo Sie Ihren digitalen Fußabdruck hinterlassen. Sie können sogar steuern, welche Websites auf Ihre Daten zugreifen können, welche nicht. Es wird empfohlen, diese Add-Ons in Chrome zu deaktivieren, bevor Sie mit dem Download fortfahren. Wenn das Problem von ihnen verursacht würde, wäre es gelöst.
Dies schließt nicht nur die Chrome-Erweiterungen ein, Sie sollten auch JEDES Programm deaktivieren, das sich auf Ihr Netzwerk bezieht (Datenmonitor, VPNs usw.). Es ist besser, es zu versuchen, als mit den weiteren Lösungen fortzufahren, die komplexer sind.

Lösung 3: Ändern Ihrer Download-Region
Eine der grundlegenden Korrekturen umfasst das Ändern des Download-Bereichs.
Das Steam-Inhaltssystem ist in verschiedene Regionen unterteilt. Der Client erkennt Ihre Region automatisch über Ihr Netzwerk und legt sie als Standard fest. Manchmal sind Server in einer bestimmten Region überlastet oder es kommt zu einem Hardwarefehler. Das Ändern des Download-Bereichs kann daher das betreffende Problem lösen. Sie können jederzeit versuchen, die Download-Regionen mehrmals zu ändern (dies ist nicht nur auf einen Versuch beschränkt), bevor Sie mit weiteren Lösungen fortfahren.
- Öffnen Sie Steam und klicken Sie im Dropdown-Menü in der oberen linken Ecke des Fensters auf " Einstellungen ".
- Wählen Sie " Downloads " und navigieren Sie zu " Download Region ".
- Wählen Sie andere Regionen als Ihre eigenen aus und starten Sie Steam neu.

Lösung 4: Löschen von clientregistry.blob
Die Client-Registrierung Ihres Steam kann beschädigt werden. Dies kann der Grund sein, warum Sie auf den Fehler stoßen. Wir können versuchen, es umzubenennen / zu löschen.
- Beenden Sie Steam vollständig und beenden Sie alle Aufgaben wie in der obigen Lösung erwähnt.
- Navigieren Sie zu Ihrem Steam-Verzeichnis. Die Standardeinstellung ist C: \ Programme \ Steam .
- Finde ' ClientRegistry.blob' .

- Benennen Sie die Datei in ' clientregistryold.blob ' um (oder Sie können die Datei vollständig löschen).
- Starten Sie Steam neu und lassen Sie die Datei neu erstellen.
Hoffentlich läuft Ihr Client wie erwartet. Wenn es immer noch nicht funktioniert, führen Sie die unten aufgeführten Schritte aus.
- Navigieren Sie zurück zu Ihrem Steam-Verzeichnis.
- Suchen Sie 'Steamreporter. exe '.

- Führen Sie die Anwendung aus und starten Sie Steam neu.
Lösung 5: Löschen Ihrer Steam-Download-Warteschlange
Wenn Ihr Steam-Client viele ausstehende Downloads enthält, wird empfohlen, alle bis auf einen zu entfernen und Steam neu zu starten.
- Öffnen Sie Ihren Steam-Client und wechseln Sie zur Registerkarte Bibliothek .
- Unten sehen Sie eine anklickbare Option mit der Aufschrift " Download angehalten ". Klicken Sie darauf, damit alle Optionen in der Warteschlange angezeigt werden.

- Klicken Sie nacheinander auf die Schaltfläche (siehe Abbildung unten), um die Elemente aus der Warteschlange zu entfernen .

- Sobald Sie sie entfernt haben, klicken Sie mit der rechten Maustaste auf Spiele (außer dem, das Sie zuerst herunterladen möchten), damit die Einstellungen angezeigt werden. Sobald die Einstellungen geöffnet sind, klicken Sie auf die Schaltfläche " Deinstallieren ".

- Steam fordert Sie auf, Ihre Aktionen zu bestätigen. Klicken Sie auf Löschen, wenn die Eingabeaufforderung angezeigt wird, und starten Sie Steam neu, bevor Sie versuchen, das eine Spiel erneut herunterzuladen.

Lösung 6: Verwenden der Flush-Konfiguration
Wir können versuchen, den Befehl flush config auszuführen, um die Konfiguration zurückzusetzen. Folgen Sie den unteren Schritten.
- Drücken Sie Windows + R, um die Anwendung Ausführen aufzurufen.
- Im Dialogleiste, geben Sie „ Dampf: // flushconfig “.

- Drücken Sie OK . Steam öffnet nun ein Fenster, um Ihre Aktionen zu bestätigen. Drücken Sie OK und starten Sie Steam neu.

Lösung 7: Starten von Steam im abgesicherten Modus mit Netzwerk.
Before resorting to more technical methods, you can try running your PC in safe mode (with networking) and try to start the Steam download.
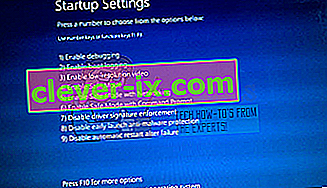
- Get your computer to safe mode by selecting from various options available. Select ‘Enable Safe Mode with Networking’. You can learn how to get your PC to safe mode from here. If you are running Windows 7, press F8 upon the startup of your PC and you will be directed to a similar window where you can select the required option.
- Open Steam and try updating/installing with it again. This method should remove all obstacles (if any) which your Steam may be experiencing.
Solution 8: Disabling Safe-web from router
Your WiFi router may have a setting called safe-web in it. What this does is filter all the incoming data it deems are not trustworthy. It is very common for it to flag Steam as one and disrupts the connection with your computer.
Since there are hundreds of different routers used by the users, it is very difficult to list the solution on how to disable the option for every one of them. Here are some guidelines so you can have an idea.
- Web Safe can be found in the parental control section on the WiFi router configuration.
- It can also be found on the Virus section or the Filtering section.
- To enter your router settings, type the IP which is associated with it (for example for some it is 192.168.1.1). You can check the required IP either by calling your modem provider or by looking at the back of the device ( even its packaging box may have details).
Solution 9: Disabling Anti-virus and Defender/firewall
Before proceeding to reinstall Steam, we can try meddling with the antivirus. Antivirus monitors each packet of your computer sends and receives. Although Steam has collaborated with most of them so they don’t give problems, sometimes they do. The solution is to disable/uninstall them and check if you are able to download then.
McAfee Antivirus:
McAfee has no way to exclude certain files from its real time scanning. The only way is to disable the antivirus entirely until the game is updated. To do this, open McAfree and select “Virus and Spyware Protection”. Here you find the option of “Real-Time Scanning”. Click that option and turn it off.

Then follow the following instruction to verify integrity of game files.
- Restart your computer and relaunch Steam.
- Head over to the library section and right click on the game which is giving you problems.
- Click on its properties and select the local files tab.
- Click the verify integrity of game files button and Steam will verify that game in a few minutes.
Hopefully, after performing the above steps, your Steam won’t give any issue.

ESET NOD32
NOD32 has the tendency to mark some application files as malicious and will most probably quarantine it. This often results in the error while updating a game. Browse to your current Steam directory and copy the address
- The default location for your steam folder should be “C:\Program Files (x86)\Steam”.
Press ⊞ Win + R button. This should pop-up the Run application.
In the dialogue box write “C:\Program Files (x86)\Steam”.

Or if you installed Steam in another directory, you can browse to that directory and you can proceed with steps mentioned below.
After copying the address open ESET NOD32 and paste the location in exclude from real time scanning.
Follow the ‘verify integrity of game files’ method listed above and you will be all good.

Kaspersky AV
Kaspersky may sometimes flag Steam as an intruder and disable it from making any changes to the hard drive. To fix this, head over to ‘threats and exclusions’. Navigate to ‘trusted zone’ and add Steam.exe as a trusted application. Remember to change the settings to Do not restrict application activity as well as Do not scan opened files.
Follow the ‘verify integrity of game files’ method listed above and restart your computer.

Windows Defender
- Click Windows button and in the search bar type “Windows defender”. Among all the options, there will be an application named “Windows Defender Security Center”. Open it.
- Upon opening, you will find a list of options available in the new window. Select the option “Virus and threat protection”.

- Upon entering the menu, navigate to Virus and Threat Protection Settings. Windows may prompt you to allow administrator access to use this feature. If so, press Yes.

- After entering the required menu, you should search the window which says “Add or remove exclusions”. Click it and you will be navigated to a menu where you can add exclusions. You can exclude folders, extensions, and even files. In this case, we will exclude the whole Steam folder which is located in the directory you downloaded it.

- Click on the option which says “Exclude a folder” and navigate to your Steam directory. The default location for your steam folder should be “C:\Program Files (x86)\Steam”. Once you reach the location select the folder and save changes.
- Restart your computer and run Steam with administrative privileges. Hopefully, your speed issue will be resolved.
Solution 10: Downloading Latest Steam Client
- The default location for your steam folder should be “C:\Program Files (x86)\Steam”.
Press ⊞ Win + R button. This should pop-up the Run application.
In the dialogue box write “C:\Program Files (x86)\Steam”.

Or if you installed Steam in another directory, you can browse to that directory and you can proceed with steps mentioned below.
- Locate the following folders:
Steam.exe (Application)SteamApps (Folder)Userdata (Folder)
- Delete all the other files/folders/applications except the ones mentioned above.
- Head over to the Steam website and download the latest Steam client. Don’t launch the old Steam.exe present in your directory at all. The problem won’t be solved.
- Install Steam using the installer in the same directory as your previous one. Hopefully, after installation, the problem will be solved.
Solution 11: Changing Default Browser
In a weird turn of events, having Chrome or any other browser set as the default browser sometimes causes issues with the download request that Steam sends to its servers. Therefore, in this step, we will be setting internet explorer as our default browser temporarily to make sure that the download proceeds. For that:
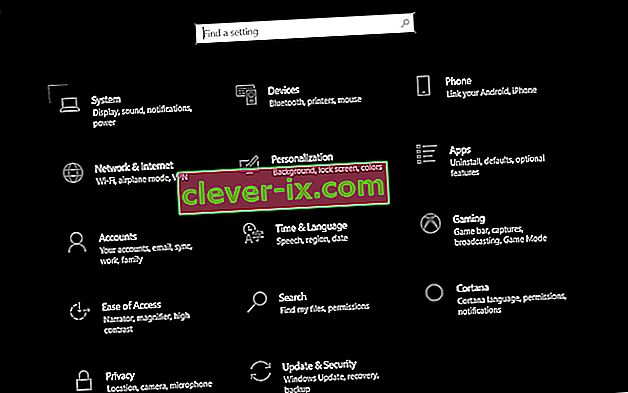
- Press “Windows’ + “I” to open settings.
- In settings, click on “Apps” and then select “Default Apps” from the left pane.
- Click on the “Web browser” option and then select “Internet Explorer” from the list.
- Open Steam and check to see if the issue persists.
Solution 12: Removing Steam Content Server Limiter
In certain cases, it was shown that uninstalling Steam Content Server Limiter from the Classical Control Panel interface fixes this issue for a lot of people. Therefore, in this step, we will be doing exactly that. For that:
- Press “Windows’ + “R” to open the Run prompt.
- Type in “Control” and press “Enter”.

- Click on the “Uninstalla Program” option and then right-click on the “Steam Content Server Limiter” and select “Uninstall”.
- After the server limiter is uninstalled, check to see if the issue persists.
Method 13: Changing DNS
In certain situations, the server DNS that the computer is using to communicate with the internet might not be compatible either with the steam servers or it might be facing issues temporarily. Therefore, in this step, we will be changing our DNS servers. For that;
- Press “Windows’ + “R” to open the Run prompt.
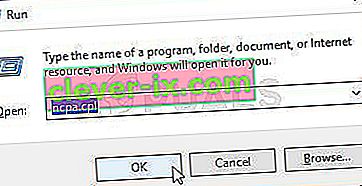
- Type in “ncpa.cpl” and press “enter”.
- Right-click on your network adapter and select “Properties”.
- In properties, double click on the “Internet Protocol Version 4(TCP/IPV4)” option and check the “Use following DNS Addresses” option.
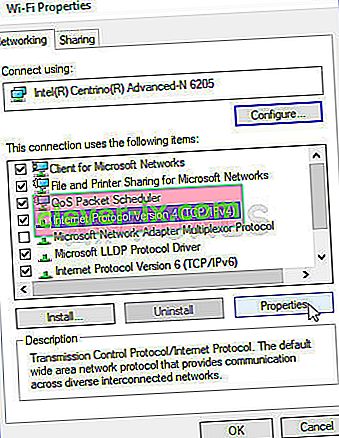
- Type in “8.8.8.8” in the primary DNS address and “8.8.4.4” in the secondary DNS address.
- Click on “OK” and then check to see if the issue persists. If it does, try using “1.1.1.1” and “1.0.0.1” in the fields respectively.
Method 14: Changing Config File
In certain situations, the config file on the computer might require some editing in order to get it some games to start working. The steps listed below are primarily for Mac but you can try them on some older OS such as Windows XP too as some users reported that this fixed it for them.
- Open the Mac Finder and navigate to the following directory.
drive_c/Program Files/Steam/config/
- Launch the “config.vdf” file and wait for it to open.
- Find the following text lines inside the file.
"InstallConfigStore" { "Software" { "Valve" { "Steam" "cip" - Paste the following lines of code under the “cip” entry in the config after creating a new line under it.
CS" "valve511.steamcontent.com;valve501.steamcontent.com;valve517.steamcontent.com;valve557.steamcontent.com;valve513.steamcontent.com;valve535.steamcontent.com;valve546.steamcontent.com;valve538.steamcontent.com;valve536.steamcontent.com;valve530.steamcontent.com;valve559.steamcontent.com;valve545.steamcontent.com;valve518.steamcontent.com;valve548.steamcontent.com;valve555.steamcontent.com;valve556.steamcontent.com;valve506.steamcontent.com;valve544.steamcontent.com;valve525.steamcontent.com;valve567.steamcontent.com;valve521.steamcontent.com;valve510.steamcontent.com;valve542.steamcontent.com;valve519.steamcontent.com;valve526.steamcontent.com;valve504.steamcontent.com;valve500.steamcontent.com;valve554.steamcontent.com;valve562.steamcontent.com;valve524.steamcontent.com;valve502.steamcontent.com;valve505.steamcontent.com;valve547.steamcontent.com;valve560.steamcontent.com;valve503.steamcontent.com;valve507.steamcontent.com;valve553.steamcontent.com;valve520.steamcontent.com;valve550.steamcontent.com;valve531.steamcontent.com;valve558.steamcontent.com;valve552.steamcontent.com;valve563.steamcontent.com;valve540.steamcontent.com;valve541.steamcontent.com;valve537.steamcontent.com;valve528.steamcontent.com;valve523.steamcontent.com;valve512.steamcontent.com;valve532.steamcontent.com;valve561.steamcontent.com;valve549.steamcontent.com;valve522.steamcontent.com;valve514.steamcontent.com;valve551.steamcontent.com;valve564.steamcontent.com;valve543.steamcontent.com;valve565.steamcontent.com;valve529.steamcontent.com;valve539.steamcontent.com;valve566.steamcontent.com;valve165.steamcontent.com;valve959.steamcontent.com;valve164.steamcontent.com;valve1611.steamcontent.com;valve1601.steamcontent.com;valve1617.steamcontent.com;valve1603.steamcontent.com;valve1602.steamcontent.com;valve1610.steamcontent.com;valve1615.steamcontent.com;valve909.steamcontent.com;valve900.steamcontent.com;valve905.steamcontent.com;valve954.steamcontent.com;valve955.steamcontent.com;valve1612.steamcontent.com;valve1607.steamcontent.com;valve1608.steamcontent.com;valve1618.steamcontent.com;valve1619.steamcontent.com;valve1606.steamcontent.com;valve1605.steamcontent.com;valve1609.steamcontent.com;valve907.steamcontent.com;valve901.steamcontent.com;valve902.steamcontent.com;valve1604.steamcontent.com;valve908.steamcontent.com;valve950.steamcontent.com;valve957.steamcontent.com;valve903.steamcontent.com;valve1614.steamcontent.com;valve904.steamcontent.com;valve952.steamcontent.com;valve1616.steamcontent.com;valve1613.steamcontent.com;valve958.steamcontent.com;valve956.steamcontent.com;valve906.steamcontent.com"
- Save your changes and check to see if the issue persists.
Note: Some users reported to fix the issue after having to deleting the CM List IP addresses in the file aswell in addition to pasting this code.


